We deliver all over europe
  • Business customer?
  • info@vesa-adapter.com
  • en en
    de Deutsch fr Français it Italiano es Español
  • GBP GBP
    EUR EUR USD USD
  • Register or Sign in
vesa-adapter.com
vesa-adapter.com
  • Monitor Mounts
    • Desk Mounts
    • Wall Mounts
    • Monitor Stands
    • Accessories
  • TV Mounts
    • TV Ceiling Mounts
    • TV Stands & Floor Stands
    • TV Wall Mounts
  • VESA Adapters
    • Acer
    • AOC
    • ASUS
    • BenQ
    • CSL
    • DELL
    • HP
    • HP Omen
    • Huawei
    • Koorui
    • Lenovo
    • LC-Power
    • MSI
    • ODYS
    • Philips
    • Samsung
    • Viewsonic
    • Xiaomi
  • VESA Extensions
    • VESA Adapter Plates
    • VESA Spacers
    • Height Adjustable VESA Adapters
  • Device Mounts
    • Camera Mounts
    • PC Mounts
    • Soundbar Mounts
  • Accessories
    • Screen Cleaners
    • Cable Management
    • Screws & Mounting Sets
    • Extension Arms
  • Ergonomics Guide
    • 1. Introduction to ergonomics
    • Ergonomics in the workplace
    • 2. Technology and ergonomics
    • VESA Standard
    • Inches to CM Calculator
    • All VESA standards
    • VESA monitor mount
    • Identify VESA standard
    • VESA Adapter for gaming
    • 3. FAQ
    • FAQ about VESA standard
    • 4. VESA adapter
    • VESA adapter Acer
    • VESA adapter AOC
    • VESA adapter ASUS
    • VESA adapter BenQ
    • VESA adapter CSL
    • VESA adapter DELL
    • VESA adapter HP
    • VESA adapter Odys
    • VESA adapter LC-Power
    • VESA adapter HP Omen
    • VESA adapter HUAWEI
    • VESA adapter Koorui
    • VESA adapter Lenovo
    • VESA adapter MSI
    • VESA adapter Philips
    • VESA adapter Samsung
    • VESA adapter Viewsonic / Medion
    • 5. News
    • VESA for ODYS Q27 und Q27 Pro Monitor
    • VESA for LC-Power LC-M27 monitor
    • 6. Wissen & Technik
    • Focus on monitor mounts: Mechanics, assembly, and stability
    • Single Monitor Desk Mount Comparison
    • Monitor Mount for 2 Monitors comparison (Desktop Mount)
    • The perfect home office setup
    • VESA Adapters for every Monitor
    • Ultrawide & Curved Monitore sicher montieren: Der
    • Securely mounting a TV wall mount
    • TV Halterung im Wohnmobil
  • en en
    de Deutsch fr Francais it Italiano es Español
  • GBP GBP
    EUR EUR USD USD
  • Monitor Mounts
    Desk Mounts
    Wall Mounts
    Monitor Stands
    Accessories
  • TV Mounts
    TV Ceiling Mounts
    TV Stands & Floor Stands
    TV Wall Mounts
  • VESA Adapters
    Acer AOC ASUS BenQ CSL
    DELL HP HP Omen Huawei Koorui
    Lenovo LC-Power MSI ODYS Philips
    Samsung Viewsonic Xiaomi
  • VESA Extensions
    VESA Adapter Plates
    VESA Spacers
    Height Adjustable VESA Adapters
  • Device Mounts
    Camera Mounts
    PC Mounts
    Soundbar Mounts
  • Accessories
    Screen Cleaners
    Cable Management
    Screws & Mounting Sets
    Extension Arms
  • Ergonomics Guide
    1. Introduction to ergonomics
    • Ergonomics in the workplace
    2. Technology and ergonomics
    • VESA Standard
    • Inches to CM Calculator
    • All VESA standards
    • VESA monitor mount
    • Identify VESA standard
    • VESA Adapter for gaming
    3. FAQ
    • FAQ about VESA standard
    4. VESA adapter
    • VESA adapter Acer
    • VESA adapter AOC
    • VESA adapter ASUS
    • VESA adapter BenQ
    • VESA adapter CSL
    • VESA adapter DELL
    • VESA adapter HP
    • VESA adapter Odys
    • VESA adapter LC-Power
    • VESA adapter HP Omen
    • VESA adapter HUAWEI
    • VESA adapter Koorui
    • VESA adapter Lenovo
    • VESA adapter MSI
    • VESA adapter Philips
    • VESA adapter Samsung
    • VESA adapter Viewsonic / Medion
    5. News
    • VESA for ODYS Q27 und Q27 Pro Monitor
    • VESA for LC-Power LC-M27 monitor
    6. Wissen & Technik
    • Focus on monitor mounts: Mechanics, assembly, and stability
    • Single Monitor Desk Mount Comparison
    • Monitor Mount for 2 Monitors comparison (Desktop Mount)
    • The perfect home office setup
    • VESA Adapters for every Monitor
    • Ultrawide & Curved Monitore sicher montieren: Der
    • Securely mounting a TV wall mount
    • TV Halterung im Wohnmobil
Business customer?
Business customer?
  1. Home
  2. Securely mounting a TV wall mount


vesa-adapter.com GUIDE

Mounting TV & Monitor Wall Mounts: Step by Step

You've invested a lot of money in your new OLED TV or high-end monitor? Then you shouldn't leave anything to chance during installation. In this guide, you'll learn everything about wall properties, choosing the right anchors, and perfect ergonomics. We'll guide you from the first drill hole to a secure hold.

📅 Status: 22/01/2026 ✍️ Editor: Julius E. ⏱️ Reading time: approx. 15 min.
A man mounting a TV wall mount in the living room

📑 Table of Contents (Navigation)

1. Checklist 2. Planning 3. Safety 4. VESA Check 5. Wall & Anchors 6. Mounting 7. Cables ? FAQ

🧰 Checklist: Preparation

Good tools are half the battle. Have the following items ready:

📏 Measuring & Checking
  • Spirit level
  • Pencil
  • Stud finder / Wire detector
  • Folding rule / Tape measure
🔨 Drilling
  • Drill
  • Masonry drill bit (matching size!)
  • Vacuum cleaner
🔧 Mounting
  • Screwdriver
  • Wrench / Ratchet
  • Hammer
  • 2nd Person (Helper)

1. Planning: The Perfect Height & Position

The most common mistake during installation isn't the wrong anchor, but the wrong height. A TV hanging too high like a painting inevitably leads to neck pain.

Tip: Cut out a piece of cardboard in the size of your TV and tape it to the wall. Then sit on your sofa and check if the viewing angle feels relaxed.

📏 The Ergonomic Height

Rule of thumb TV (Living room):
Sit relaxed on your sofa. Your eyes should be level with the lower third of the screen.

Rule of thumb Monitor (Desk):
Here you sit upright. The top edge of the screen should be exactly at eye level.

🔊 Planning a Soundbar?

Account for the height of the soundbar + approx. 5cm distance to the bottom edge of the TV before you make your marks!

☀️ Light & Viewing Distance

Avoid reflections:
Never mount the TV directly opposite a window. Light coming from the side (90 degrees to the window) is ideal.

The ideal seating distance:
For modern 4K TVs: Screen diagonal x 1.5. For 55 inches, you ideally sit approx. 2.10 meters away.

🌈 Ambilight / LED Strips?

For the light effect to radiate softly against the wall, the TV needs approx. 10-20cm wall distance. Avoid "Ultra-Slim" mounts if you have background lighting.

⚡

2. The Safety Check: Observe Installation Zones

Drilling into a power cable is life-threatening. Don't rely on luck.

  • The "Golden Rule": In modern buildings, cables usually run vertically or horizontally to sockets and switches. Never drill directly above, below, or next to electrical outlets.
  • The Old Building Risk: In houses built before 1960, cables were often laid "the shortest way" (diagonally). Only a high-quality detector helps here.

3. Hardware Check: VESA & Screws

The connection between TV and bracket is just as important as the one to the wall. Misunderstandings about standards often lurk here.

What does the VESA standard mean?

The Video Electronics Standards Association (VESA) defines the distance between the four threaded holes on the back. Only if the mount and monitor match (e.g., VESA 200x200), do they fit together.

Important: There are many different standards (MIS-D, MIS-E, MIS-F) for different weight classes.
To the overview of all VESA standards & sizes ›

Digression: The Screws (M4, M6, M8)

The heavier the TV, the thicker the screws. Small monitors use M4 (4mm thick), large TVs mostly M6 or M8. Attention: The screws must not be too long! If you feel resistance, stop screwing, otherwise you will damage the panel from the inside. Use washers or spacers.

Special case: Monitors without VESA holes Many design monitors (Apple iMac, HP, Dell) have a smooth back. Never drill into the housing! You need an adapter.
Find VESA adapters here ›
VESA
100x100

Measure the distance in mm.

4. Wall Condition & Anchor Choice

Do the knock test: Does it sound hollow (drywall) or solid (concrete)? A test drill gives final certainty.

Material Identification (Drilling dust) Recommended Anchor Drilling Setting
Concrete / Solid The ideal case Gray (Concrete) or white (Sand-lime brick). Dusty, fine like powder. Expansion Anchor
(e.g., Fischer SX)
Hammer Drilling: YES
Perforated Brick Classic old building Red or Orange. Drill "stutters" and falls through voids. Universal Anchor
(e.g., DuoPower)
Hammer Drilling: NO!
Rigips / Drywall Critical White, fine gypsum powder. Sticks slightly to the drill. Hollow behind. Cavity Toggle / Toggle Bolt
(e.g., Fischer DuoTec)
Rotary Drilling (no impact)
Aerated Concrete (Ytong) Soft & porous White, coarse flour. Very easy to drill. Aerated Concrete Anchor
(e.g., GB Anchor)
No impact
Concrete / Solid (Ideal case)
Identification
Gray/White powder, very hard.
Anchor
Expansion Anchor (SX)
Drilling
✅ Hammer Drilling: YES
Perforated Brick (Old building)
Identification
Red dust, drill stutters.
Anchor
Universal Anchor (DuoPower)
Drilling
❌ Hammer Drilling: NO!
Rigips / Drywall
Identification
White dust, hollow behind.
Anchor
Cavity Toggle (DuoTec)
Drilling
Rotary Drilling (no impact)
Aerated Concrete (Ytong)
Identification
White, coarse flour. Very soft.
Anchor
Aerated Concrete Anchor (GB)
Drilling
No impact
💡
Pro-Tip: Anchor Size & Leverage

Don't underestimate the leverage effect with swivel monitor arms! If you pull the monitor 50cm away from the wall, the load pulling on the top anchor multiplies ("pull-out effect").
Recommendation: Always use one size larger for swivel arms. Instead of size 8 anchors (S8), prefer size 10 anchors (S10) with matching 8mm hexagonal wood screws. These offer significantly more pull-out resistance.

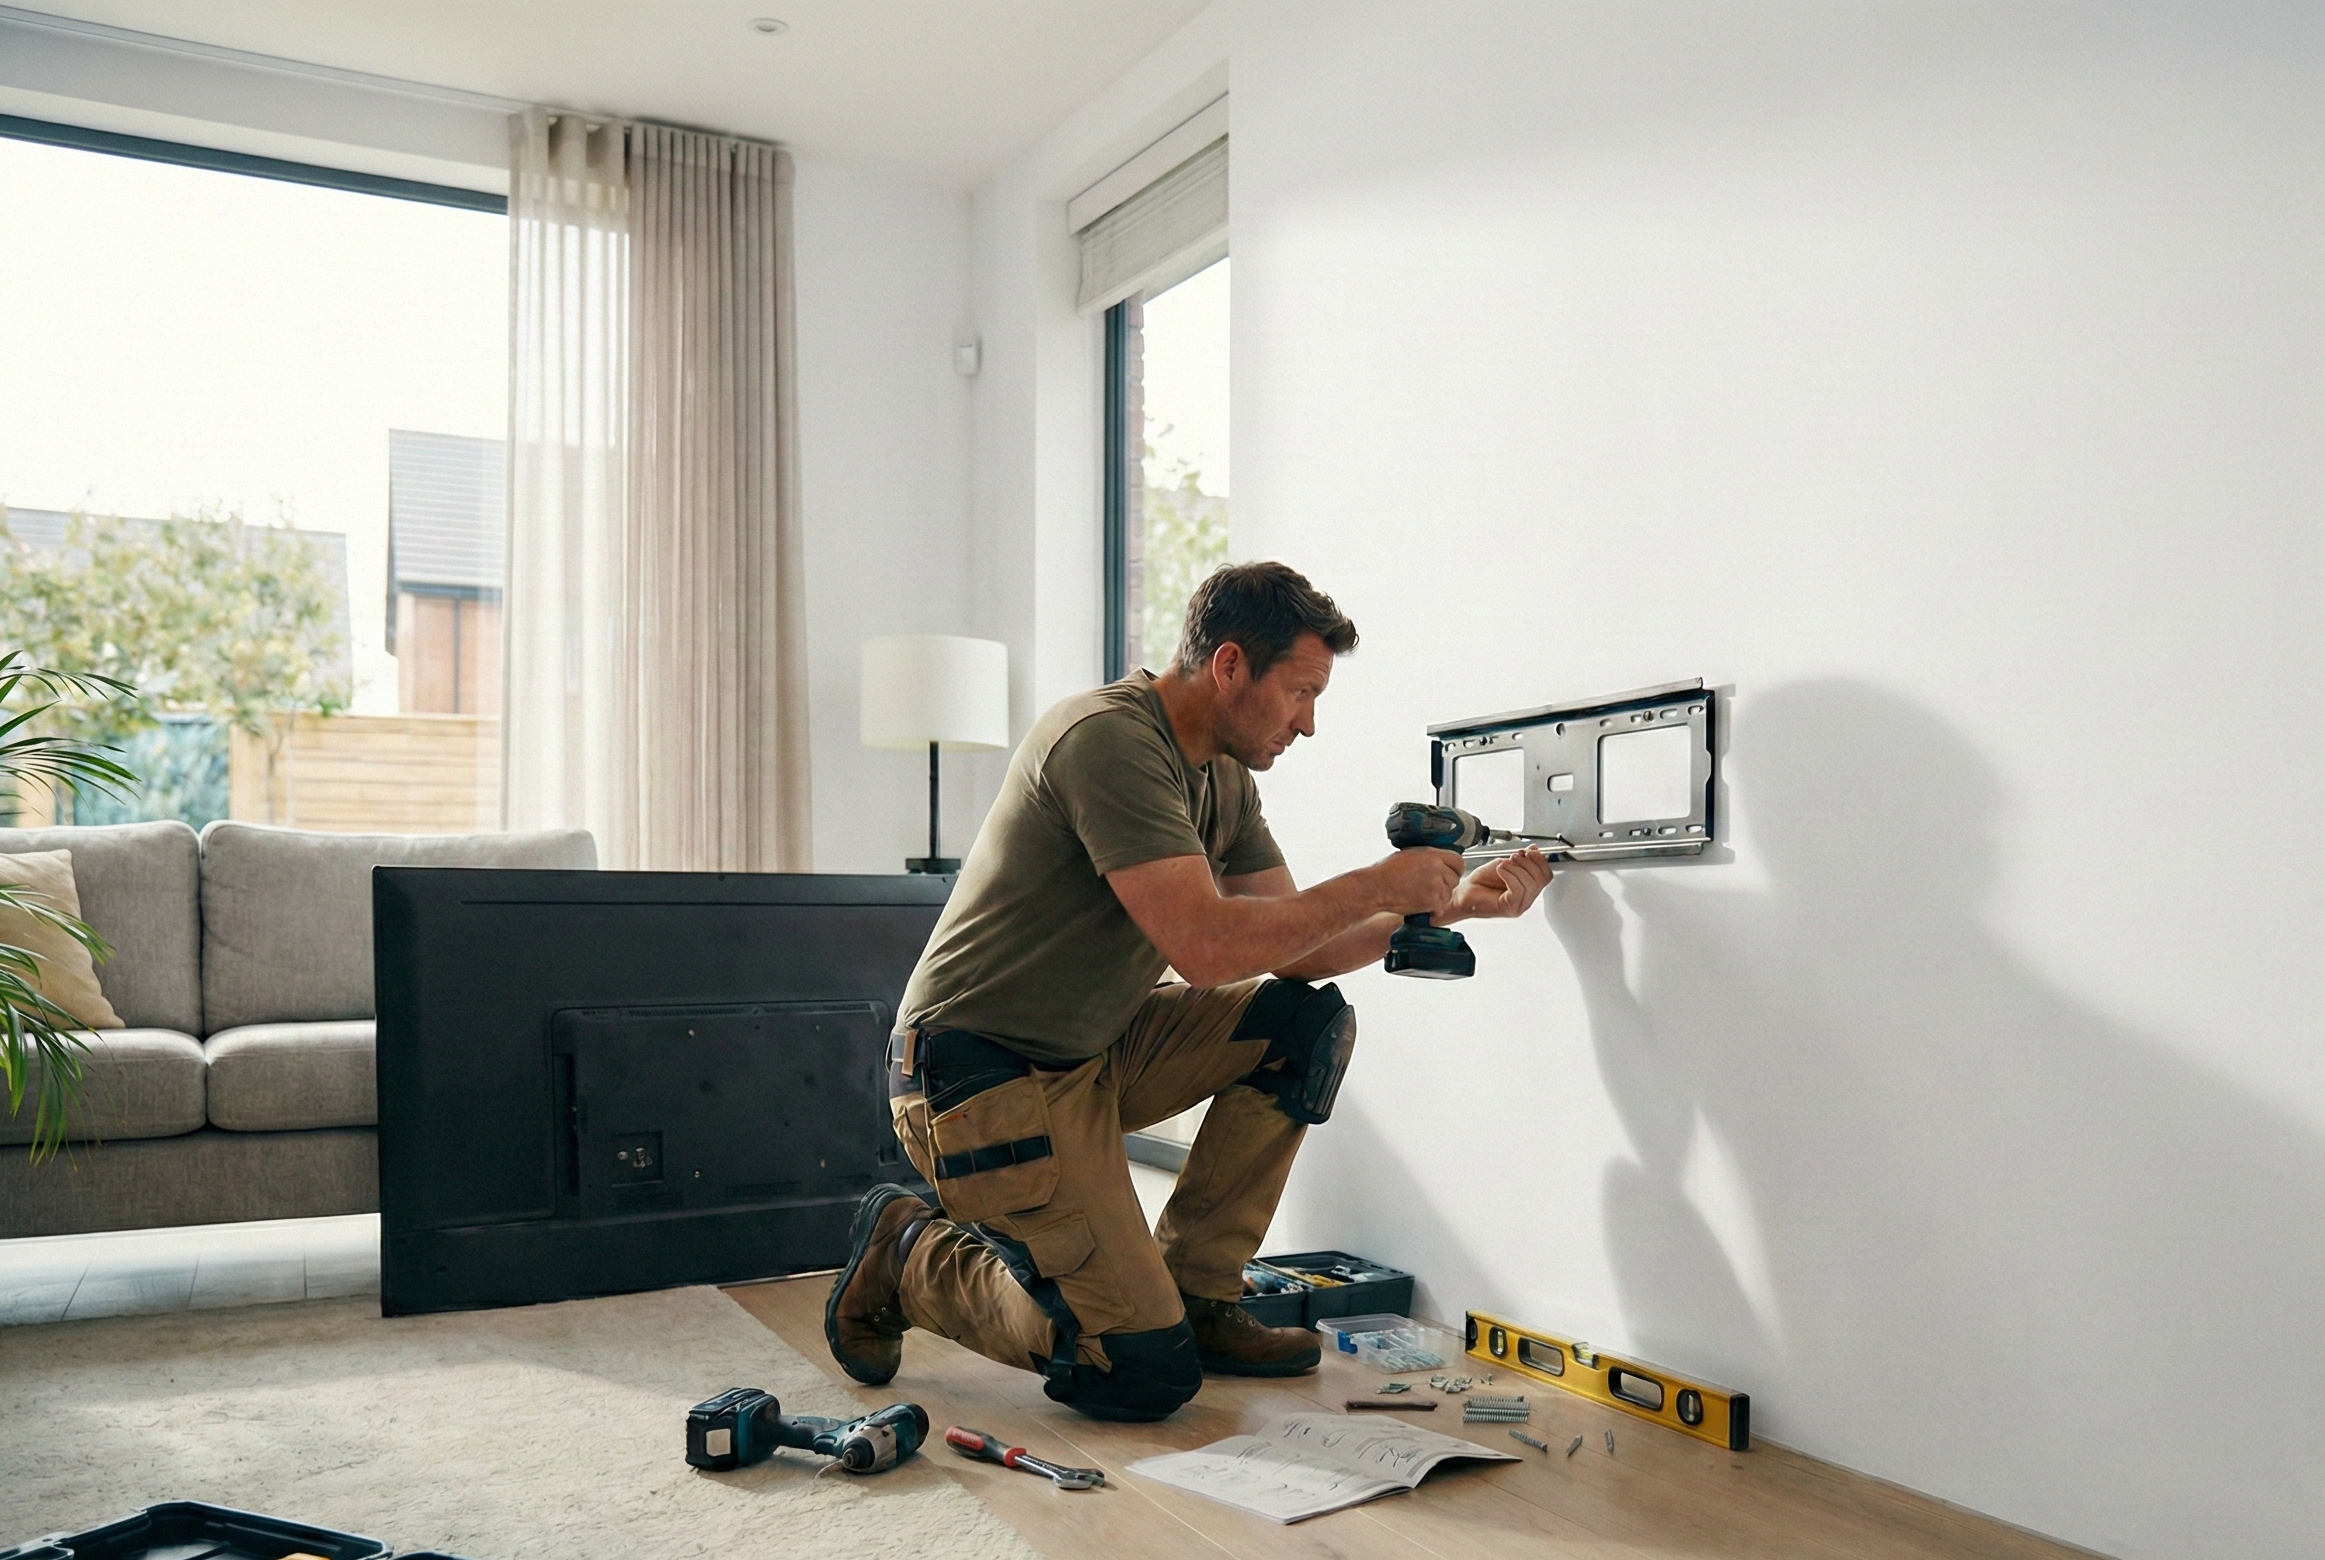
5. Step-by-Step Installation Guide

You have the space, checked the safety, and have the right anchors ready? Then it's time for implementation. Work calmly and precisely.

1

Marking

Hold the wall plate against the wall. Align it exactly with the spirit level. Mark the drill holes with the pencil.

2

The Drilling Lifehack

One of the best tips for clean work: Fold a sticky note or take an old envelope. Tape it with masking tape directly under the marked drill hole on the wall. Fold it open slightly. All the drilling dust will now fall directly into the envelope instead of onto the floor or baseboard.

3

Drilling

Place the drill at a right angle.
The right depth: Anchor length + 10mm. Mark the depth on the drill bit with tape.

4

Cleaning (Important!)

80% of DIYers forget this step: Vacuum out the drill hole! Pull the vacuum cleaner over the hole and move the drill bit back and forth slightly inside it. Remaining drilling dust acts like "ball bearings" and reduces the holding power of the anchor by up to 50%. Only now press the anchor in flush.

5

Screwing on & Hanging

Screw the wall plate tight. Tighten hand-tight.
The 4-hands principle: Never lift the TV onto the mount alone if it is larger than 40 inches. The risk of damaging the panel or slipping is too great. One holds, one screws/locks.

6. Finish: Cables & Fine Adjustment

The TV hangs, but black cables are dangling down the white wall? That ruins the look. Here is the finishing touch.

On the Wall: Cable Ducts

Use self-adhesive semi-circular ducts in wall color. These can be painted over and elegantly hide HDMI and power cables on the way to the socket.

On the Arm: Velcro Cable Ties

Ideally, fasten the cables to the monitor arm with Velcro cable ties. Unlike rigid plastic ties, these do not constrict and are easy to release.
Important: Test the cable length in all swivel positions!

🚑 First Aid: Solutions for Drilling Problems

Things don't always go according to plan. Here you will find quick solutions for the most common mishaps.

Drill hole too big or frayed?
This often happens in porous old building plaster.
Solution A (Quick): Take the next larger anchor. Solution B (Pro): Wrap a repair fleece around the anchor or fill the hole with 2-component mortar.
Drill stops (steel/reinforcement)?
Solution: Stop immediately. Drill a new hole approx. 2-3cm offset. Close the failed hole with filler.
Anchor spins with the screw?
Lifehack: Put 1-2 matches or toothpicks into the hole together with the anchor. This wedges the anchor when screwing in.
Screw broken off?
Solution: If it sticks out: Grab it with locking pliers. If it's stuck deep: Do not drill out! Better to drill new holes and move the mount.
Mis-measured - new hole next to it?
Attention: Keep a distance of at least 2x drill hole depth. If not possible: First completely fill the old hole with cement and let it harden.

Frequently Asked Questions about Mounting (FAQ)

1. Am I allowed to drill in a rented apartment?+
Yes, drilling is part of the contractual use of a rented apartment. You are allowed to hang up shelves and TV mounts. Important: The holes must be filled when moving out.
2. Can I mount the TV above the heater?+
Better not. Electronics do not like heat. The rising warm air can shorten the lifespan of the TV. In addition, heaters stir up dust, which is drawn into the device.
3. How tight do I have to tighten the screws?+
"Hand-tight". The mount must no longer wobble, but brute force can strip the anchor.
4. What if the mount hangs crooked?+
Don't panic. Good wall mounts have slotted holes. Loosen the screws slightly, align the plate with the spirit level, and tighten them again. Many TV mounts can also be rotated by +/- 3 degrees ("Leveling").
5. Do I need a special mount for Curved TVs?+
Not necessarily a special mount, but often longer screws and spacers to compensate for the curvature of the back. These are usually included with universal mounts.
6. Will a drywall hold my 65-inch TV?+
Only conditionally. A single layer of plating carries approx. 40kg per meter - but only with flat mounting. Swivel arms tear out quickly due to the leverage effect! Always mount large devices on drywall directly to the studwork (beams) behind the panel.
7. My TV tilts down by itself - defective?+
No. The weight of the TV pulls on the tilt joint. On the side of the joint, you will usually find a screw (Allen or rotary knob). Tighten this to increase the resistance.
8. Can I use glue instead of drilling?+
Absolutely not! Mounting adhesive holds a lot statically, but the permanent tensile load of a TV (especially with heat development) is too risky. The plaster could detach from the wall together with the adhesive.
9. What are spacers?+
Small cylinders that create distance between the TV and the plate – important for uneven backs or long screws.
10. How often do I have to check the screws?+
We recommend shaking it vigorously once immediately after assembly. After that, you should check briefly every 6-12 months (e.g., during spring cleaning) to see if everything is still tight, especially with frequently moved swivel arms.
Your cart
Subtotal: 0,00 £
Fingerprint
Chat on Whatsapp

Sign up to our newsletter

for important news, great offers and insights from the VESA Adapter Team

vesa-adapter.com
vesa-adapter.com
3idee SARL
19, Rue de Bitbourg
1273 Luxembourg
Luxembourg
info@vesa-adapter.com
Live Chat

Support

  • Return
  • Goods not arrived
  • Product damaged
  • FAQ
  • Assembly instructions

Information

  • About us
  • Shipping
  • Privacy policy
  • Our Terms & Conditions
  • Imprint
  • Right of withdrawal

Find it fast

  • Acer
  • AOC
  • ASUS
  • BenQ
  • CSL
  • DELL
  • HP
  • HP Omen
  • Huawei


  • Koorui
  • Lenovo
  • LC-Power
  • MSI
  • ODYS
  • Philips
  • Samsung
  • Viewsonic
  • Xiaomi
© 2026 - 3idee Sàrl
Paypal AmazonPay klarna Visa Mastercard American Express Discover Diners Club Carte Bancaire JCB Union Pay eps iDeal bancontact Przelewy24

Hello, welcome back

Login to manage your account.

Forgot passwort?
No account yet? Register now

Welcome to vesa-adapter.com

Complete the form to create an account

You already have an account? Login

Forgot passwort?

Enter your email address and we will send you an email with your new password.

You remember again? Login